Reducing Docker Image Size (Particularly for Kubernetes Environments)
One Day on Slack...
1.3gb for a web app?! The size of your Docker image is getting out of control!
Uh-oh... The infrastructure team is calling you out for your Docker image size! Larger images means...
- Garbage collection of stale images & containers takes longer*
- Node storage runs out faster*
- It takes longer to build the image
- It takes longer to send the image over the wire
All of these are small problems but they add up! So your image is too big–don't panic! Following a few simple steps, you can cut your Docker image down to size in next to no time.
*this post assumes you are running Docker images in Kubernetes.
Contents of This Post
Analyzing Your Image
How big is your image? Assuming you've run docker build to build your image locally, this is easy to check with docker images:
➜ docker images
REPOSITORY                           TAG      IMAGE ID      CREATED       SIZE
gcr.io/ns-1/toodle-app               d82c28d  e4f0fd00de6d  4 months ago  1.32GB
gcr.io/ns-2/go-af                    v0.12.1  d665db43eb95  4 months ago  911MB
Our toodle-app image is 1.32 GB. But why is it so big? To figure that out, we'll use a handy tool called dive to analyze the image layer by layer.
➜ dive gcr.io/ns-1/toodle-app:d82c28d
Image Source: docker://gcr.io/ns-1/toodle-app:d82c28d
Fetching image... (this can take a while for large images)
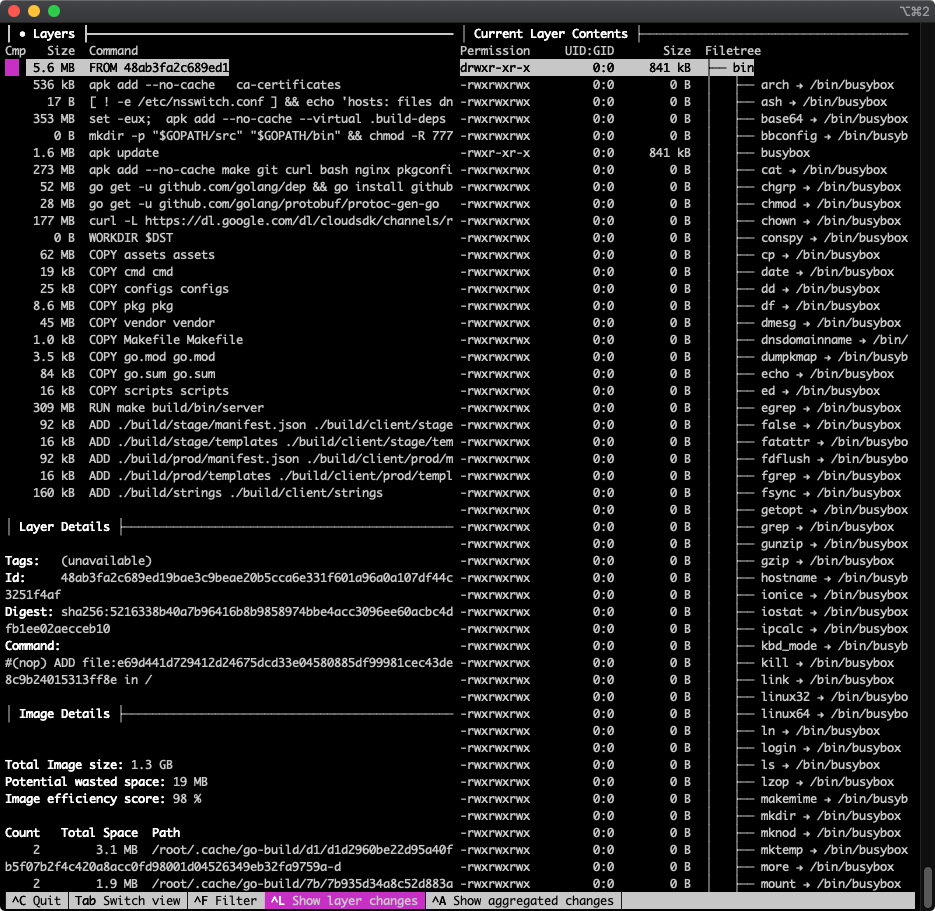
When it completes it will show a view like this:

There's a lot going on here!
- The top-left panel shows you layers, each of which corresponds to a Dockerfile command. (If the command is truncated, find the full command below in the "Layer Details" section.)
- The right column shows the filesystem tree for the currently selected layer–more on this later
- The bottom left is Image Details and does not change as you navigate through the layers
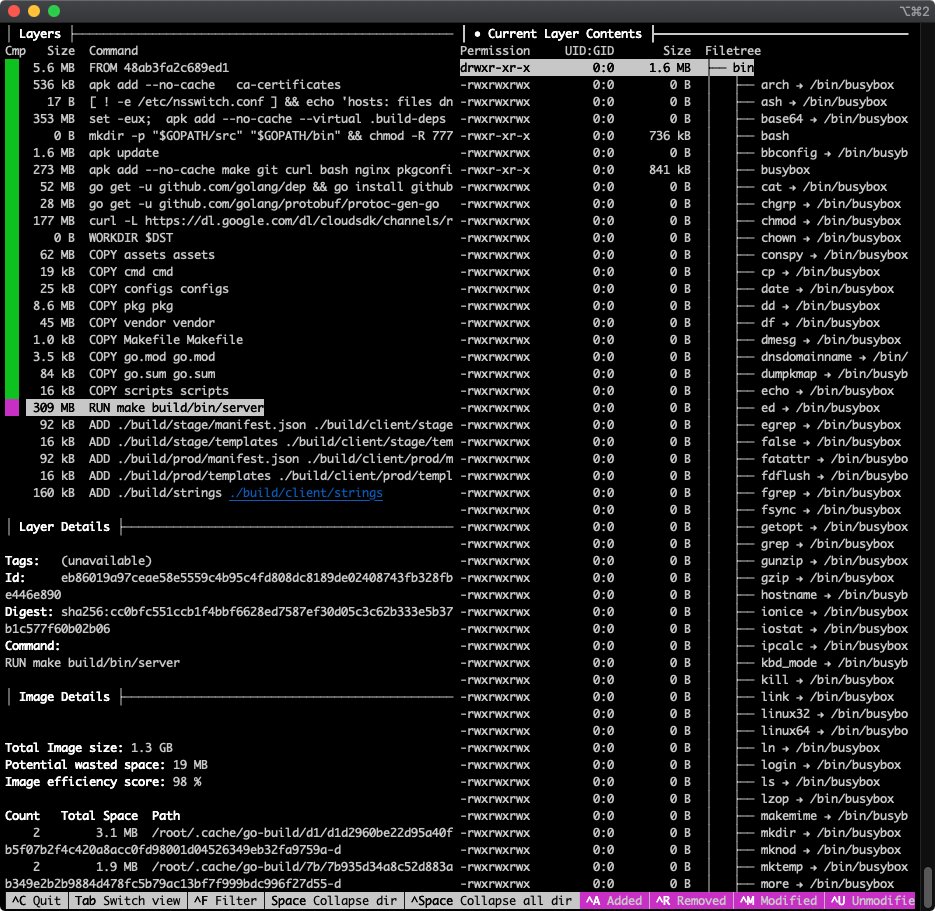
Use the arrow keys to navigate up and down in the currently selected pane. Use tab to switch from the Layers pane to Current Layer Contents and back. Here I've pressed the down arrow several times to get to the 309 MB RUN make build/bin/server layer, then used tab to switch focus to the Current Layer Contents panel:

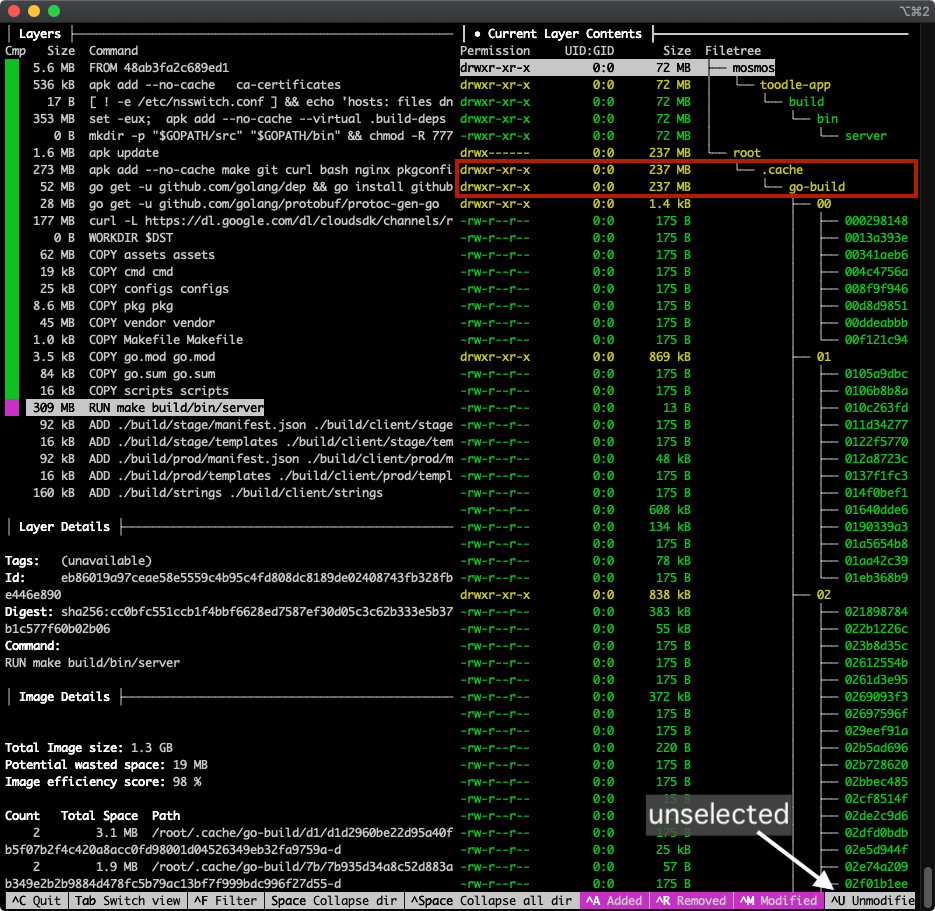
By default, the Current Layer Contents shows you a full tree of the filesystem up to and including the selected layer. What's typically more useful when analyzing your image size by layer is to see what files were added by that layer. Use ctrl+u (see "^U Unmodified" in the bottom right of the screenshot) to toggle that option off, which hides files unmodified by the current layer. This leaves visible only files that were Added, Removed, or Modified by this layer:

Hello, what's this–this layer (which runs go build to build the actual toodle-app binary) add 309MB, but 237MB of that is go mod cache, which we do not need after the binary has been built!
Now we know why this layer is larger than it should be and we can see about cleaning it up (we'll do this below). Repeat the process for other large layers, or just poke around and see what each layer is adding or modifying.
Now that we know how to figure out why it's big, let's look at some strategies to cut down an image's size...
Chopping Your Image in Twain
When we build a project inside a docker image, each of the things we pull or copy into that image falls into one of two categories:
- Stuff we need to build the application
- Stuff we need to run the application
Some of the things we add to our toodle-app image, above:
make: needed to build the applicationgcc: needed to build the application- go modules: needed to build the application
nginx: needed to run the application./build/client/strings: needed to run the application- the
build/bin/serverbinary we create: needed to run the application
The stuff we need only at build time (make, gcc, etc.) does not need to be shipped as part of the image because it is not needed at runtime. We could uninstall make gcc etc. after running the build, but there is an even cleaner way: create one image just for building the application and one image just for running the application.
This has become a common pattern, and there are two ways to do this:
Two Separate Docker Files ❌ (old approach, should not be needed anymore)
With this approach you have one "builder" image and a separate "runtime" image. From a high level:
- A
Dockerfile.builderDockerfile defines your "builder" image. This builds an image based on.... - A separate runtime
Dockerfilecontains only runtime dependencies
Your CI step (e.g. on Google Cloud Build) loads the "Builder" image and runs docker inside that image to produce your runtime image.
Multi-Stage Builds ✅ (current approach: use this one 😄_)_
Multi-Stage Builds vastly simplify this process! A multi-stage docker file has multiple FROM commands, the first one for the "builder" and the second one for the "runtime." Basically you install all the build dependencies in your builder, run your build, then in the runtime build you COPY the build artifact into your runtime image which you can then deploy.
# Base image for our "builder" contains the go binary which we
# do NOT need at runtime (only to build the server application binary)
FROM golang:1.7.3 AS sequoiasbuilder
WORKDIR /tmp/foo
COPY src/main.go . # copy from host into builder

# build our go binary
go build -o my-application ./main.go

# The second FROM is a new image!
# (our "runtime" image)
FROM alpine:latest # using a stripped down linux (no go!)
WORKDIR /root/

# This has _nothing_ from the builder unless we copy it in
COPY --from=sequoiasbuilder /tmp/foo/my-application .
CMD ["./my-application"]
Now only those things necessary for runtime will be shipped to kubernetes, and the go binary (and all the go modules that go build pulled in) etc. are discarded! Read this short article for more.
Which one to use? A note on layer caching
The main reason to use the "multiple dockerfiles" approach is because the underlying "builder" image can be built once and reused across many builds. But Docker image layers by default, so why would you need this? You would need this if your (CI) build environment is discarding Docker image layers after each build, as Google Cloud Platform does by default. Discard docker images after each build = build from scratch each time.
There is a simple fix for this, however: the Kaniko builder allows layers to be stored, cached, and reused.
❗️ On GCB, using Kaniko is recommended for both builder and multi-stage patterns. Read more.
Cleaning Up Image Contents
Assuming you don't go the Multi-Stage route (above), or even if you did, you may be able to reduce your image size by removing stuff you don't actually need.
Ensure you actually need everything you've added
Did you start building your dockerfile by copying an existing one? If so, perhaps you have a command like this near the top
RUN apk add --no-cache make git curl bash nginx pkgconfig zeromq-dev \
     gcc musl-dev autoconf automake build-base libtool python
Check that you actually need all these things! Some may be cruft from another project, or the dependency may have been replaced. This is especially important if you're building off a shared "base" image file. When using a shared base image, it's very likely that there's stuff in there you don't need. Easy money!
Remove build tools and assets after the build completes
As we saw above using dive, the toodle-app go build was downloading and caching 237 MB of go modules, which were needed during the build but not after:
│ Current Layer Contents ├──────────────────────────────────────
Permission     UID:GID       Size  Filetree
drwxr-xr-x         0:0      72 MB  ├── mosmos
drwxr-xr-x         0:0      72 MB  │   └── toodle-app
drwxr-xr-x         0:0      72 MB  │       └── build
drwxr-xr-x         0:0      72 MB  │           └── bin
-rwxr-xr-x         0:0      72 MB  │               └── server
drwx------         0:0     237 MB  └── root
drwxr-xr-x         0:0     237 MB      └── .cache
drwxr-xr-x         0:0     237 MB          └── go-build
The following change fixed this problem in toodle-app:
- RUN make build/bin/server
+ RUN make build/bin/server && go clean -cache
Other examples of this are removing gcc/make/webpack or removing dev-dependencies for a JavaScript project.
Remove static assets when possible
You may have static assets in your image that rarely change and are not actually needed within the application. For example, the toodle-app image contains various reports and media assets:
-rw-r--r--         0:0      12 MB                  ├── MarketReport.pdf
-rw-r--r--         0:0      12 MB                  ├── EconReport.pdf
-rw-r--r--         0:0      34 MB                  ├── Toodle-MediaKit.zip
drwxr-xr-x         0:0     4.3 MB                  ├── press-releases
It's not huge, but this is 62MB that gets pulled by the Kubernetes controller for every deployment and copied into every container (the image upon which this post is based was running on 268 containers at the time of writing), all of which need garbage collection... it adds up!!
Conclusion
Making your images smaller is easy, it improves infrastructure performance and it saves money. What's not to like? If you've got more tips for shaving bits off your image size, drop me a line & I'll add them below!
📝 Comments? Please email them to sequoiam (at) protonmail.com