Kubernetes Resource Optimization: Just The Basics
One of the promises of container orchestration (e.g. Kubernetes) is that you can automatically scale up and down as needed and save money. This can be true with Kubernetes, but that automation doesn't happen automatically! When you set up your own cluster, you take on the responsibility for tuning it for performance and cost. If you don't tune, you don't save!
How much can running a Kubernetes cluster cost? As an single example, a friend at a mid-sized company I spoke with recently was spending 250,000 US dollars per month running applications in Kubernetes (not including storage & network costs!). A company like this has 250,000 reasons (per month) to pay attention to resource usage and work on reducing it. But how?
Pre(r)amble on Accuracy and Generalization
How do you write about optimizing Kubernetes clusters without getting into the weeds? The whole thing is just weeds.
Basically, every sentence in this post has one or more caveats. I have chosen to omit the "except in the following cases..." and "as long as the following is true..." statements. To get a more realistic picture, close your eyes and imagine a Kubernetes expert saying, "actually it's a bit more complicated than that" after every sentence.
But fear not! There are some "rules of thumb" that can help you realize significant savings without having to become a Kubernetes expert.
High-Level Goals
- Goal 1: Cost: Use as few resources as possible to reduce how much we spend renting computers (where our Kubernetes cluster ultimately runs)
- Goal 2: Availability: Keep our application availability high and keep response times within acceptable ranges
- Goal 3: Scaling Handle spikes in traffic gracefully (sort of a sub-goal of Goal 2: Availability)
Background: How does Kubernetes Allocate Resources to Containers?
ℹ️ Skip this section if you're already familiar with how requests, limits, and HPAs work.
In a Kubernetes Cluster, each "workload" (for example, a web server application) runs in one or more pods (generally a wrapper around a single docker container). In a Kubernetes "deployment," we tell Kubernetes how many instances (pods) of our application to run, and what sort of resources we expect each of those pods to need (requests). We can also tell Kubernetes not to let a pod exceed a certain resource usage limit (limits) and to shut down any pod that does.
For example, we can tell Kubernetes, "Hey Kubernetes, run 3 Nginx instances; I expect each will use 1 CPU and 512Mi of RAM, but do not let it use more then 1Gi of RAM."
apiVersion: apps/v1
kind: Deployment
name: my-nginx
spec:
  replicas: 3              ⭐️ Run three instances
  template:
    spec:
      containers:
      - name: my-nginx
        image: nginx:1.14.2
        resources:
          requests:        ⭐️ request = "This is how much my application uses typically"
            cpu: 1000m        1000 "millicpus" = 1 CPU
            memory: 512Mi
          limits:          ⭐️ limit = "Don't let the pod use more than this"
            memory: 1Gi
Telling Kubernetes an exact number of pods to run isn't very auto-scale-y, though, is it? We want more pods when we need them and fewer when we don't. We can do this by using a Horizontal Pod Autoscaler (HPA), which automatically increases and decreases the number of pods a deployment has.
How does the HPA know when to add or remove pods? Good question! The simplest way is for it to look at the average CPU usage across the pods in the deployment. When average CPU usage gets too high, add pods. When it gets too low, shut some pods down.
"Hey Kubernetes, run an HPA to scale the deployment we just made above. If the average CPU usage is well above 90%, bring more pods online. If it's much lower, shut some down. Also, don't let the total number of pods go below 2 or above 10."
apiVersion: autoscaling/v1
kind: HorizontalPodAutoscaler
spec:
  ⭐️ Scale up or down to keep the pods running ~90% CPU utilization
  targetCPUUtilizationPercentage: 90
  maxReplicas: 10  ⭐️ No more than 10 pods
  minReplicas: 2   ⭐️ No fewer than 2 pods
  scaleTargetRef:
    apiVersion: apps/v1
    kind: Deployment
    name: my-nginx
The key to optimizing our resource consumption is to run our pods as "hot" as possible, i.e. use all available CPU & memory. In an ideal world, this would mean allocating exactly as much memory as needed and no more, and consuming approximately 100% of the CPU requested.
So why not tell the HPA to do this ("Scale up to infinity, scale down to 0")? We could do this thus:
targetCPUUtilizationPercentage: 100minReplicas: 1maxReplicas: 100000requests.cpu: 1m("one millicpu" i.e. 1/1000th of a CPU)requests.memory 1 Mi- No CPU or RAM limit (infinity CPU & RAM!)
We've done it! Automatic scaling from 0 to inifinity with 100% efficiency––problem solved!
Unfortunately, It's Not That Simple...
Why It's Not That Simple
There are a couple reasons:
1. Your Containers Ultimately Run On Physical Computers With Physical Limits
The machines in a Kubernetes cluster are called "Nodes."
The requests you set for your containers tell Kubernetes how much CPU/RAM your application claims it needs to operate; Kubernetes uses this information to "schedule" your container to a node that can meet those requirements. It finds a node (physical or virtual machine) with the resources available to meet your container's requests and starts the container in that node.
If you only request cpu: 1m (one millicpu) for your application and Kubernetes has a node with 1 CPU (one thousand millicpu), Kubernetes will say "aha! This node can safely fit one thousand instances of your application!" When your 1000 pods start up on that node and each one actually wants 100m rather than 1m, that Kubernetes node will not be able to meet the pods' demands on that node. The pods will run really slowly or crash repeatedly, and Kubernetes will do nothing about it.
For this reason, it's important to tell Kubernetes roughly how much CPU & RAM your application needs so it can "set aside" an adequate amount.
2. Deployments Take Time To Scale
Assume each instance of your application can serve 1000 requests per second (rps). Your traffic is steady around 10,000rps, and you have exactly 10 pods handling it, all of them running at 100% CPU (maximum efficiency, baby!!).
All of a sudden traffic increases to 15,000rps. No problem, bring another 5 pods online.
Please wait 2-3 minutes to bring additional pods online
Two to three minutes?! Uh-oh! What are you going to do with that extra load for two to three minutes? Latency goes up, overloaded pods start to crash, and you've got an incident on your hands.
To avoid this problem, your deployments should have enough buffer (extra resources allocated) to handle spikes in traffic for two or three minutes. This means setting your HPA's target CPU utilization far enough below 100% to be able to absorb spikes in traffic long enough for Kubernetes to bring more pods online.
What Things Can You Fiddle With to Increase Efficiency?
A brief review of what requests and limits mean:
requests= "please make sure this much schedulable RAM/CPU is available on a node before putting this pod on that node" (how much your application typically uses.) This is a target (e.g. p50 behavior), not a maximum.limits= "don't let my pod use beyond this amount.- In the case of memory immediately kill it
- In the case of CPU throttle how much time it gets on the CPU
For a more detailed description check out this video from google, especially the first half.
With those basics out of the way, let's look at what settings you can change to Improve Your Efficiency:
Per Container: CPU (requests.cpu and limits.cpu)
Very High Level/General Goal: looking at a Grafana chart of pod resource usage for a specific deployment such as the example below, you want the "used" line (blue) to sit at or above the "requested" line (green). (NB: the particulars of this chart are specific to one cluster, but they are generally derived from cadvisor)
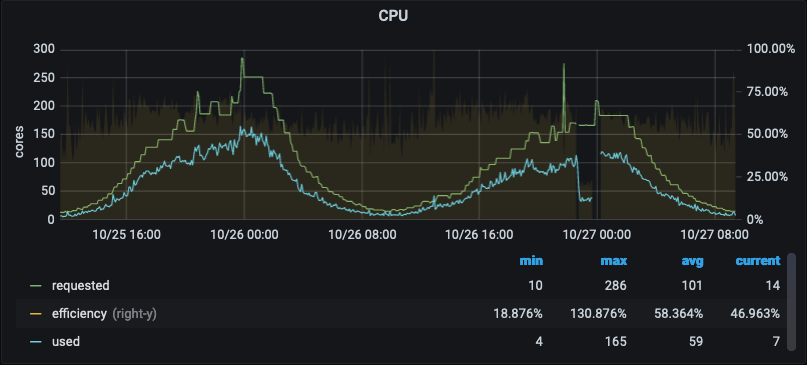
Used should be at or above requested?! That doesn't make sense! How do I use more than I requested?
It's complicated but basically there's usually extra CPU available on the node beyond the total amount of CPU requested. As explained to me by a smart Kubernetes experts:
Remember, a pod is not a virtual machine with a fixed amount of physical CPU and memory; it is a group of "containerized processes" that run on a shared virtual machine with other pods.
Anyway just try to make the blue line sit at or above the green line.
Other Rules of thumb:
- Don't
requestabove1aka"1000m"(unless you have an application specifically designed to make use of multiple cores) more info under "CPU" - Don't
requestbelow1: Assuming your workload is CPU bound (a single process can scale up 'til it runs out of CPU) it probably doesn't make sense to put this below 1 CPU. Instead, consider increasing thetargetCPUUtilizationPercentageon the HPA (see below). - Set
limitto 1.5 times whatever therequestis (e.g.requests.cpu: 1;limits.cpu: 1.5)
Per Container: Memory (requests.memory and limits.memory)
Memory you must be a bit more careful with. If a container doesn't have quite enough CPU it may run slowly. If it requires more memory than allowed by it's limit, it will be killed.
Very High Level/General Goal: looking at the graph of RAM usage like the one below, you want the blue line (used) to sit at the green line (requested). (It's OK for "used" to go over "requested" for short periods of time but not all the time.)

Rules of thumb:
- Set
requestsat or just slightly above what you typically observe a container to use - Set
limitsabove therequestvalue to give your pod some room to handle periods of time where it needs a bit more memory while protecting the node from any one process attempting to use all of the available memory on the node. Without a RAMlimit, the Kubernetes controller will not prevent a container from using 100% of the RAM on node, which would cause all other pods on the node to crash.
Horizontal Pod Autoscaler: Minimum Replicas
"How many pods do I need running during overnight hours?"
- Turn this very low so your deployment can scale down overnight to a bare minimum (assuming your business is primarily diurnal and your cluster serves a limited number of adjacent timezones)
- Consider scale-up time! If your application takes several minutes to start up, you should keep more pods online at minimum traffic (higher
minReplicasvalue) to handle any unexpected load. - Scaling below 2 is probably unwise as it leaves no redundancy at all.
Horizontal Pod Autoscaler: Maximum Replicas
"Beyond what point of scaling is my deployment obviously malfunctioning and running out of control?"
The maxReplicas setting allows you to throttle your deployment's horizontal scaling in order to control resource consumption. If yours is a business-to-consumer company, you probably don't want to do this with customer-facing services. If you were to run a TV ad that spiked traffic and website deployment wants to jump from 250 pods up to 650, you probably want to let it do that. Availability (Goal 2) is typically much more important than platform cost (Goal 1) when it comes to serving customers.
For this reason, Maximum Replics should be set to whatever the highest number of pods you've observed your deployment needing, plus 50 or 100%. Increasing this number doesn't cost anything directly.
Another consideration is resource constraints of service(s) your service connects to. For example, if your database can only handle a maximum of 1000 connections you probably want to set your max application replicas so that you do not exceed that capacity.
Horizontal Pod Autoscaler: CPU Utilization Target
This is one of the most important settings, especially for large clusters. You want this value to be as close to 100% as possible: the "hotter" your pods run, the less idle CPU you're paying for.
On the other hand, if you have _no_ idle CPU, you are unlikely to be able to handle a spike in traffic (Goal 3) while waiting for the deployment to scale up.
Interaction between requests.cpu and targetCPUUtilizationPercentage
Earlier we said "look at CPU efficiency and reduce requests.cpu if you are requesting more than you're using." That advice can be misleading when you're using an HPA that scales your cluster up and down based on average CPU utilization.
Example: If it looks like you're only running at 70% CPU efficiency, you may think "requests.cpu is 30% higher than needed, I should turn it down." But if targetCPUUtilizationPercentage it's set to 70, your CPU isn't overprovisioned, the deployment is just getting scaled up every time the average CPU across pods in the deployment goes much over 70%*, so the average usage always hovers around 70%! If your pods each request 1 CPU, the deployment will scale so they each use approximately 70% of 1 CPU. If your pods each request 600m, the deployment will scale so they each use approximately 70% of 600m.
Turn down requests.cpu all you want, utilization will continue to hover at 70%. In this case, you would need to increase targetCPUUtilizationPercentage, not decrease requests.cpu in order to increase efficiency.
- I'm not sure how much... You set it to "70" and the HPA figures out when to scale up or down to keep the average close to 70.
How High Can You Go?
That's the $64 question. The formula for this is basically:
100% - (however much buffer you need to handle traffic spikes for the time it takes additional pods to come online and be ready to serve).
For more information on how to set this, see two places in this post:
- The introduction to Horizontal Pod Autoscalers in this section
- The bullet point titled "Fine-tune the HPA utilization target"
As mentioned above, The interplay between requests.cpu and hpa.targetCpuUtilizationPercentage can be hard to grok, but you should make sure you consider both settings when setting either. As a rule of thumb, increase targetCpuUtilizationPercentage as much as possible before reducing requests.cpu. It's hard to know much CPU your container can make use of if it's being aggressively throttled by a low targetCpuUtilizationPercentage.
You'll know you've set targetCpuUtilizationPercentage too high if response latency starts to climb when you get traffic spikes (or if your pods start crashing and you have an outage 😄).
Other General Tips
Start Small!
There's no need to make big infrastructure changes all at once, and in many ways it's inadvisable! Instead of turning targetCpuUtilizationPercentage from 70 to 95, consider taking a stepwise approach: step it up to 80 and observe for a few days or a week, then try 90, observe a while, rinse and repeat. This is a safe and easy way to get started if you're not sure what settings are best!
Conclusion
Hopefully these "rules of thumb" give you enough information to get started right-sizing your deployments. There is of course more fine-tuning you can do, but following these rules should get you at least 50% of the way there–there's lots of low-hanging fruit!
If you want to read more about this fascinating topic, please see the links below.
Further Reading
- kube-resource-report Identifying overprovisioned instances is beyond the scope of this post unfortunately, but this tool is a good place to start.
- Kubernetes best practices: Resource requests and limits: This is a great intro to the various settings you can change that goes into more detail than this post.
- Best practices for running cost-optimized Kubernetes applications on GKE: This is a broader article that touches on many aspects of scaling, far beyone what I go over in this post. If this post whetted your appetite and you want to learn much more, this is the article for you! ⭐️
- Reducing Docker Image Size
- Addendum to the previous point: why reducing docker image size is important in a kubernetes environment if you want to know now)